Have I mentioned that I love decorating with royal icing? Royal icing is so beautiful to use on cutout cookies. It dries into a hard, smooth, matte finish. Yesterday I posted the Halloween Sugar Cookies that I made for my coworkers and I had many people ask me for the royal icing recipe. So here it is! 🙂
How to Decorate with Royal Icing
First you need to find a great sugar cookie recipe. My favorite ones are the Soft and Chewy Sugar Cookies from Baking Illustrated. They are amazing!
Gather all the equipment that you will need to decorate. Cute cookie cutters, disposable decorating bags, decorating tips (tips #1, #2, and #3), couplers, squeeze bottles, rubber bands, icing colors, toothpicks, and small bowls.
Before you start decorating, make sure that your cookies are completely cool.
Plan what kinds of designs that you are going to make on your cookies. I find it much easier to draw a picture of what you want your final design to look like and write down each color that you will need. Make sure that you have enough decorating bags, couplers, and small bowls for each color. Take note of what you want your flood color (or background color to be) and make sure you have enough squeeze bottles for each color.
Make the royal icing:
- 4 cups powdered sugar
- 2 tablespoons meringue powder
- 6 tablespoons water
In the bowl of a stand mixer fitted with the paddle attachment, combine powdered sugar and meringue powder. Add water and mix on low speed for 7-10 minutes. Add more water by the teaspoon if it appears too stiff. You want to be able to pipe it easily.
Evenly divide the icing into containers based on the number of colors you will be using. Cover with a lid or a wet paper towel when not using so that it does not dry out.
Cut off the ends of your disposable piping bags, insert the coupler, and tip. I like to use a number 2 or 3 piping tip to outline my cookies. Transfer some of the icing into the prepared disposable bags and seal the top closed with a rubber band so it is less messy.
Outline the cookies with whatever color you want to flood (background) them. Outline the outside of the cookie using the prepared disposable bags. When you’re outlining the cookie, keep the tip at a 45 degree angle about about 1/2 inch away from the cookie, so that the icing just falls onto the surface. It is much easier to control your piping this way.

Let sit until dry, about 15 to 20 minutes.

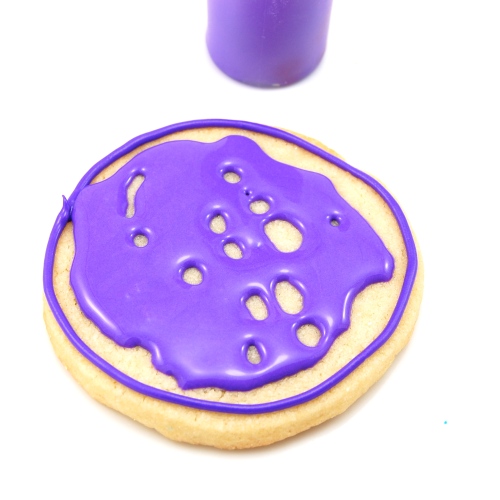
Once the outlines are dry you can flood the cookie. Add a few drops of water to the remaining icing in the small bowls until you get the correct consistency. To check for the proper consistency, dip a spoon into the icing and lift it up. The ribbons of icing drizzling into the bowl should disappear and become flat again within 10 seconds. Fill each squeeze bottle with the thinned icing.
To flood the cookie, using the prepared squeeze bottles start at one area and quickly zig zag back and forth until you have almost completely covered the cookie.
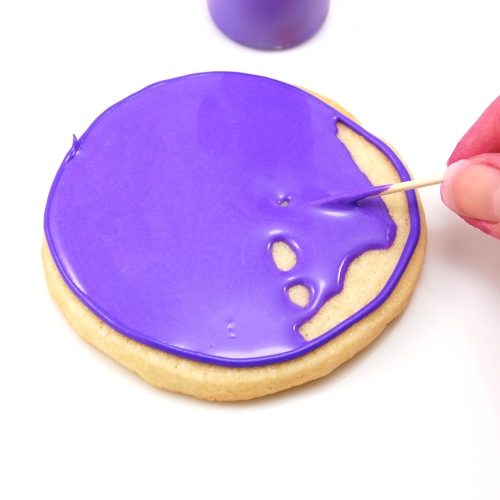
Then take a toothpick and gently use it to distribute the icing to any empty spots. Shake the cookie gently to help settle the bumps if there are any. If you notice any small air bubbles, pop them with a toothpick. Once the cookies are completely flooded, let them sit 2 to 3 hours before adding any additional designs/details to the cookies.
Decorating Tips:
Glitter: If you want to decorate with glitter or sanding sugar, shake it over the flooded wet cookie. Let dry completely and shake off any excess glitter.
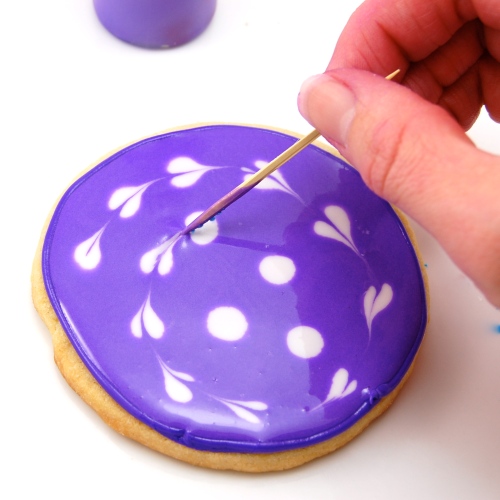
Marbling: sometimes called swirling or feathering is the process of adding one or more colors of icing through the wet flooded icing.
Then a toothpick is used to pull the icing into swirls creating the marbleized look.
Hearts: You can create hearts by piping dots into wet flooded icing and dragging the toothpick through the center of each dot.
Source: adapted from Sweetopia


Your cookies are gorgeous! I love the colors – thanks so much for sharing the tutorial!
Thank you so much! 🙂
so i am 17 years old and im always making cookies and cupcakes. i want to try some baking classes at our local community college this coming fall (in 2012). just to let you know your website is very helpful to me! THANK YOU 🙂
So beautiful! Your so good at decorating cookies. Wonderful post.
Thanks! 🙂
Lovely post! Your cookies look delicious! I’ve got a quick question for you. I recently frosted cookies using royal icing and they looked fabulous. then the next day I noticed that the colors were bleeding together. Are there any tips you might have for keeping the colors from bleeding together in the subsequent days after you ice them?
thank you for such clear instructions. Every year, I tell myself I can do this. Then, I chicken out. You’ve given me the confidence I need. Your designs are beautiful.
You are so welcome! I hope you don’t chicken out this year! It really is fun when you get the hang of it! Let me know how it turns out! 🙂
So pretty – these cookies with royal icing are little, edible works of art! Luv how you’ve made those cute heart shapes.
Thank you! 🙂 I love the hearts too…they look so cute! I think it would be perfect with pink and red icing for valentines day!
great tutorial. i especially love the little delicate hearts!
kim
http://www.lovintheoven.com
Thank you so much for showing us how to do the icing. My 5 year old daughter was looking over my shoulder the whole time asking when we get to do the cookies! LOL Thanks again!
You are so welcome! I love decorating with royal icing! When you give it a try be sure to let me know how it turns out! 🙂
I’m planning on taking both sugar cookies and royal icing out for a spin (for the very first time!) next week-ish, for a coworker’s child’s birthday. I figure, if they look like crap, it’s just a kid and she won’t care. 😉 Anyway, this is an EXCELLENT tutorial, and it will be very useful for me very soon.
Pingback: Thick and Chewy Gingerbread Cookies | Sweet Pea's Kitchen
Awesome step-by-step photos!
Pingback: Halloween Sugar Cookies | Sweet Pea's Kitchen
Pingback: Christmas Sugar Cookies | Sweet Pea's Kitchen
This is so helpful! I just made cut-out cookies last night and was going to frost them tonight. I’ve never used Royal Icing before. I don’t have meringue powder, so can I use egg whites instead?
Yep you can use egg whites, here is a good recipe:
2 large egg whites
2 teaspoons fresh lemon juice
3 cups confectioners sugar, sifted
In the bowl of your stand mixer, beat the egg whites with the lemon juice until combined. Add the sifted powdered sugar and beat on low speed until combined and smooth. Add water (or more lemon juice) to get the consistency that you want.
Good luck! Decorating with royal icing is addicting. Let me know how it turns out! 🙂
Pingback: Meal Music: Rockin’ Valentine’s Day Cookies, with help from a super-cute music-biz couple | Eating the Beats
Beautiful colors and decoration on the cookie. Cant wait to try Royal Icing. Can I use hand beater for the icing ?
Thank you so much! 🙂 You can use a hand mixer but it might take a few extra minutes for the icing to reach the right consistency. Let me know how it turns out for you!
Pingback: Black & White Cookies + Saying Goodbye to LCD Soundsystem | Eating the Beats
Pingback: Seven Links | Sweet Pea's Kitchen
can i put any flavor of imitation extract in the icing to add flavor?
Alexa,
Yes you can add extracts to the icing to add flavor. Some extracts have color so it will turn the icing that color as well. If you are wanting to make a white icing make sure to use a clear extract. 🙂
Pingback: Pumpkin Spice Sugar Cookies | Sweet Pea's Kitchen
Pingback: General Tso’s Chicken | Sweet Pea's Kitchen
Pingback: Michigan Mitten Gingerbread Cookies (Inspired by Rosie Thomas) | Eating the Beats
Thank you. Your directions were great and helped me create some pretty wedding gown cookies for our bridal shower.
Excellent Angela! I am so glad the tutorial was helpful! 🙂
Pingback: Fireworks Cookies | Sweet Pea's Kitchen